Step 1 – Create Navigation Detail Page
- Click on Presentation and then Pages.
- Click New Page

- From Categories, select General and from Templates select Blank; name the page Navigation Detail; click Save.
- On save you will be redirected to the detail page of the Navigation Detailpage
- Click on the Paramters tab and click Add
- Set name to Id, Type to Integer, and Required to Yes
- Click on the General tab and launch the Page Builder by clicking on Page Builder

- In the Page Builder, find the DOM tab and click on PageManager
- Click on Settings
- Click on the Resources tab and click Add
- Set Name to NavLib, type to Ready
- Click on the magnifying glass on the far right of the Uri and load the Navigation Library by clicking on the green checkmark
- Click Save and click Save again in the Configuration window

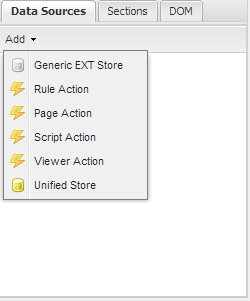
- In Data Sources click the Add button and add a Unified Store
- Give it name storeDetail
- Set its Data Source to Client
- Check the Detail and Delete checkboxes
- Click on the Detail tab and Properties
- Into Before Load paste: showMyLoadingMask('Loading...');
- Into Load paste: hideMyLoadingMask();

- Click Save
- In the Detail tab, set the Id attribute to Value Id
- Click on the Delete tab and click Properties
- Add the following to Success: gotDeleted.execute();
- Click Save
- In the Delete tab, set the Id attribute to ValueId
- Click Save in the Configuration window
- The Detail page will look similar to the Update and New pages, except instead of text area or text fields or menus, everything will be labels
The TopBar will include several custom labels, the code for which can be found here:
Code Block <TopBar> <ext:Toolbar runat="server" Height="33px" Cls="mainHeader" AutoRender="False" ID="pnMain_TopBar_tb" Style="border-bottom-color: White; padding-top: 5px;" Border="true"><Items> <ext:Label runat="server" Text="Client" Icon="Lorry" Cls="EcxDetailBaseName" AutoRender="False" ID="lbBaseTitle"></ext:Label> <ext:Label runat="server" Cls="EcxDetailRecordName" AutoRender="False" ID="lbSpecificTitle"></ext:Label> <ext:ToolbarFill runat="server" AutoRender="False" ID="ToolbarFill1"></ext:ToolbarFill> <ext:Button runat="server" Icon="Pencil" Text="Edit" AutoRender="False" ID="pnMain_TopBar_bt1"> <Listeners> <Click Fn="PageManager.scriptAction_execute_scriptOpenUpdatePage"></Click> </Listeners> </ext:Button> <ext:Button runat="server" Icon="BulletCross" Text="Delete" AutoRender="False" ID="pnMain_TopBar_bt2"> <Listeners> <Click Fn="PageManager.ruleAction_execute_storeDetail_Delete"></Click> </Listeners> </ext:Button> <ext:Button runat="server" Icon="Cancel" Text="Close" AutoRender="False" ID="pnMain_TopBar_bt"> <Listeners> <Click Handler="EcxPageNav.Util.closeMe();"></Click> </Listeners> </ext:Button> </Items> </ext:Toolbar> </TopBar>
This code can simply be pasted into the Source tab
- The page will look like this:

- Select storeDetail and click on Settings
- Notice the Controls tab prepopulates with your labels
- To First Name, also add the lblSpecificTitle control which was created in the TopBar above

- Click Save
- Click Save in the Configuration window
- Select pnMain and click on TopBar
- Click on the buttons to see their listeners which have already been prepopulated from pasting into the source code
- In the case of button Close we see a Handler added to the configuration
- Click Save
- Add a Script Action called gotDeleted
- Click on Properties
Add the following code
Code Block EcxPageNav.Util.executeParentCallback(); EcxPageNav.Util.closeMe();- Click Save
- Add a Page Action called navUpdate
- Click on Settings
- Set its Data Source to Navigation Update and its Store Adapter to storeDetail[Detail]
- Set Id to value Id
- Add another parameter called BaseName and set its value to lbBaseTitle
- Add another parameter called RecordName and set its value to lbSpecificTitle

- Click on General Settings, check Open Window in popup and set Width to 650; click Apply
Into Callback action add
Code Block storeDetail_Detail.reload(); EcxPageNav.Util.executeParentCallback();
- Click Save
- Add a Script Action called scriptOpenUpdatePage
- Click on Properties
- Set Script Action Text to: EcxPageNav.Util.openManagedPage(arguments[0].record, navUpdate);
- Set the store adapter to storeDetail[Detail]
- Add an argument called aggArgs and set its column to Id
- Click Save
- Click on Save Page at the top left of the screen, and click Ok to the Page Was Saved notification