Step 1 – Create Client List
The Client List will display a list of all the client records.
- Click on Presentation and then Pages.
- Click New Page

- From Categories, select General and from Templates select Blank; name the page Client Search; click Save.
- On save you will be redirected to the detail page of the Client Search page, from here launch the Page Builder by clicking on Page Builder

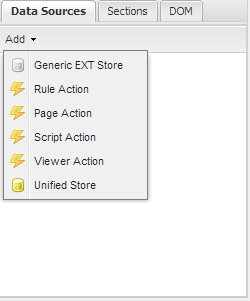
- In Data Sources click the Add button and add a Unified Store
- Set its ID to storeClients and click Create
- Make sure storeClients is selected and in the Properties panel at the right of the screen, click on Settings
- Set Data Source Type to Business Objects
- Set Data Source to Client
- Check the List checkbox and check the Delete checkbox
- Click Save
- Make sure pnMain is selected and in Properties set its layout to border
- Into the pnMain design surface drag a Grid and call is grdClients, set its title to Clients
- Set its region to center
- Click on Settings
- Set Data Source to storeClients[List]
- Add the following columns to the grid: First Name, Last Name, Email, Mobile Phone, and Mailing Address
- Click on any of the columns to adjust their attributes, for example change the width of the columns to 200

- Click on the General tab and check the Use Paging checkbox; from Selection Model select Row Selection
- Click Apply
- Click Save
- In the Data Sources tab, click Add and add a Page Action; call it newClientPage
- Right click on newClientPage and click on Properties
- Set Data Source to New Client
- In General Settings, check the Open Window in popup checkbox
- Set Window Width to 800
- Into CallBback Action Text add grdClients.getStore().reload();

- Click Save
- Make sure grdClients it selected and click on TopBar in the Properties panel
- Add a button called New Client with icon Add
- Set its Listener to Click and its Fn to PageManager.pageAction_execute_newClientPage, click Apply
- Add a button called Export with icon PageWhiteExcel
- Set its Listener to Click and its Fn to PageManager.grid_export_grdClients
- Click Save
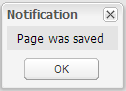
- Click on Save Page at the top left of the screen, and click Ok to the Page Was Saved notification
- Now go back to the New Client Page Builder
- Make sure storeClients is selected and in the Properties panel at the right of the screen, click on Settings
- Click on the Create tab
- In Properties and add clientCreated(); to the Success textarea.

- Click Save
- Click Save in the Configuration window
Click on the Source tab and add the following JavaScript to the Head tag
1 2 3 4 5 | <script language="javascript">
function clientCreated() {
parent.newClientPage.close();
}
</script>
|
- Click on Apply Source Code
- Click on Save Page at the top left of the screen, and click Ok to the Page Was Saved notification
Step 2 – Create Client Search
The Client Search will quickly allow for searches among records
- Drag an Exc Search Form into pnMain
- Call it searchClients and set its Region to East and click Save in the Properties panel
- Click on Settings in the Properties panel
- Set Data Source to storeClients[List]
- Select First Name, Last Name, Email, and Mobile Phone as search criteria

- Click Save
- Click on TopBar in the Properties panel
- Add a button called Search with icon Magnifier
- Set Listeners to Click
- Set Fn to PageManager.searchForm_search_searchClients
- Click Apply
- Add a button called Clear with icon Erase
- Set Listeners to Click
- Set Fn to PageManager.searchForm_clear_searchClients
- Click Apply
- Click Save
- Click on Save Page at the top left of the screen, and click Ok to the Page Was Saved notification
Step 3 – Security Role, Application, Deploy
- From the Navigation Menu, click on Security and underneath it click on Roles.
- Add a Role named ClientWorker. Click Save.
- Go to Applications and make a new User Application called “Client Management”. Upon Save you’ll get redirected to the Application Builder.
- Right click on the house icon and click Add Page.

- Call it “Client Search”, set it’s icon to User.
- The Target page will be Client Quick Add.
- Check the Start Page checkbox.
- Click Save.
- Click on the Application Permissions tab and then the Edit button. Set the ClientWorker to Allow and click Save.
- From the Navigation Menu, click on Deployment Management and underneath it click on Deploy.
- Select the Environment.
- Click Preview
- Click Execute SQL. Wait till you get the green checkbox indicating everything was successful.
- Click Confirm.
- On the top left where it says Application Studio, switch to System Setup.
- From the Navigation Menu, click on User Management and underneath it click on Users.
- Find yourself in that list and click on the blue link.
- Go to the User Roles tab.
- Click Edit and move the ClientWorker for your solution to the right and click Save.
- Logout and Log In.
- Select the Client Management application.