- From the Navigation Menu, click on Security and underneath it click on Roles.
- Add a Role named ClientWorker. Click Save.
- Go to Applications and make a new User Application called “Client Management”. Upon Save you’ll get redirected to the Application Builder.
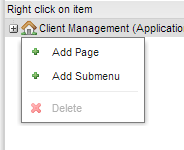
- Right click on the house icon and click Add Page.
- Call it “Navigation Result”, set it’s icon to User.
- The Target page will be Navigation Result.
- Check the Start Page checkbox.
- Click Save.
- Click on the Application Permissions tab and then the Edit button. Set the ClientWorker to Allow and click Save.
- From the Navigation Menu, click on Deployment Management and underneath it click on Deploy.
- Select the Environment.
- Click Preview
- Click Execute SQL. Wait till you get the green checkbox indicating everything was successful.
- Click Confirm.
- On the top left where it says Application Studio, switch to System Setup.
- From the Navigation Menu, click on User Management and underneath it click on Users.
- Find yourself in that list and click on the blue link.
- Go to the User Roles tab.
- Click Edit and move the ClientWorker for your solution to the right and click Save.
- Logout and Log In.
- Select the Client Management application.