Step 1 – Create Client Grid
The Client List will display a list of all the client records.
- Click on Presentation and then Pages.
- Click New Page

- From Categories, select General and from Templates select Blank; name the page Navigation Result; click Save.
- On save you will be redirected to the detail page of the Navigation Result page, from here launch the Page Builder by clicking on Page Builder

- In the Page Builder, find the DOM tab and click on PageManager
- Click on Settings
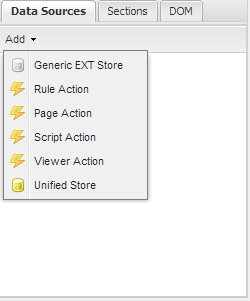
- Click on the Resources tab and click Add
- Set Name to NavLib, type to Ready
- Click on the magnifying glass on the far right of the Uri and load the Navigation Library by clicking on the green checkmark

- Click Save and click Save again in the Configuration window

- Set its ID to storeResult and click Create
- Make sure storeResult is selected and in the Properties panel at the right of the screen, click on Settings
- Set Data Source Type to Business Objects
- Set Data Source to Client
- Check the List checkbox and check the Delete checkbox
- Click on the Delete tab and click on Properties
Into the Success text area add the following code:
EcxPageNav.Util.closeManagedTab(window.__deleteRecord, navDetail);

- Click Save
- Click Save
- Make sure pnMain is selected and in Properties set its layout to border
- Into the pnMain design surface drag a Grid and call is grdResult, set its title to Clients
- Set its region to center
- Click on Settings
- Set Data Source to storeResult[List]
- Add the following columns to the grid: Age, Department, FirstName, Id and LastName
- Click on any of the columns to adjust their attributes, for example set Department to Auto Expand
- Use the arrows to rearrange the order of the columns

- Click on the General tab and check the Use Paging checkbox; from Selection Model select Row Selection
- Click Apply
- Click Save
- In the Data Sources tab, click Add and add a Page Action; call it navNew
- Right click on navNew and click on Properties
- Set Data Source to Navigation New
- In the General Settings tab, check Open Window in Pop Up and click Apply
In the Callback Action tab add the following code:
window.__newRecordId = args['Id'];
window.__newRecordName = args['FirstName'];
grdResult.getStore().reload();

- Click Save
- Add another store, this time a Script Action, call it scriptOpenNewPage
Into the configuration window, add the following code:
EcxPageNav.Util.openManagedPage({}, navNew);
- Click Save
- Make sure grdResult is selected and click on TopBar
- Click Add and add a new button
- Set Text to New and Icon to Add; click Apply

- Click on the Listeners tab and select the Click listener
- Set Fn to PageManager.scriptAction_execute_scriptOpenNewPage; click Apply
- Add another button called Export with Icon TableSave; click Apply
- Set Fn to PageManager.grid_export_grdResult; click Apply
- Click Save
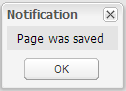
- Click on Save Page at the top left of the screen, and click Ok to the Page Was Saved notification
Step 2 – Create Client Search
The Client Search will quickly allow for searches among records
- Drag an Exc Search Form into pnMain
- Call it searchResult and set its Region to East and click Save in the Properties panel
- Click on Settings in the Properties panel
- Set Data Source to storeResult[List]
- Select First Name, Last Name, and ID as search criteria

- Click Save
- Click on TopBar in the Properties panel
- Add a button called Search with icon Magnifier
- Set Listeners to Click
Set Fn to PageManager.searchForm_search_searchResult - Click Apply
- Set Listeners to Click
- Add a button called Clear with icon Erase
- Set Listeners to Click
- Set Fn to PageManager.searchForm_clear_searchResult
- Click Apply
- Click Save
- Click on Save Page at the top left of the screen, and click Ok to the Page Was Saved notification
