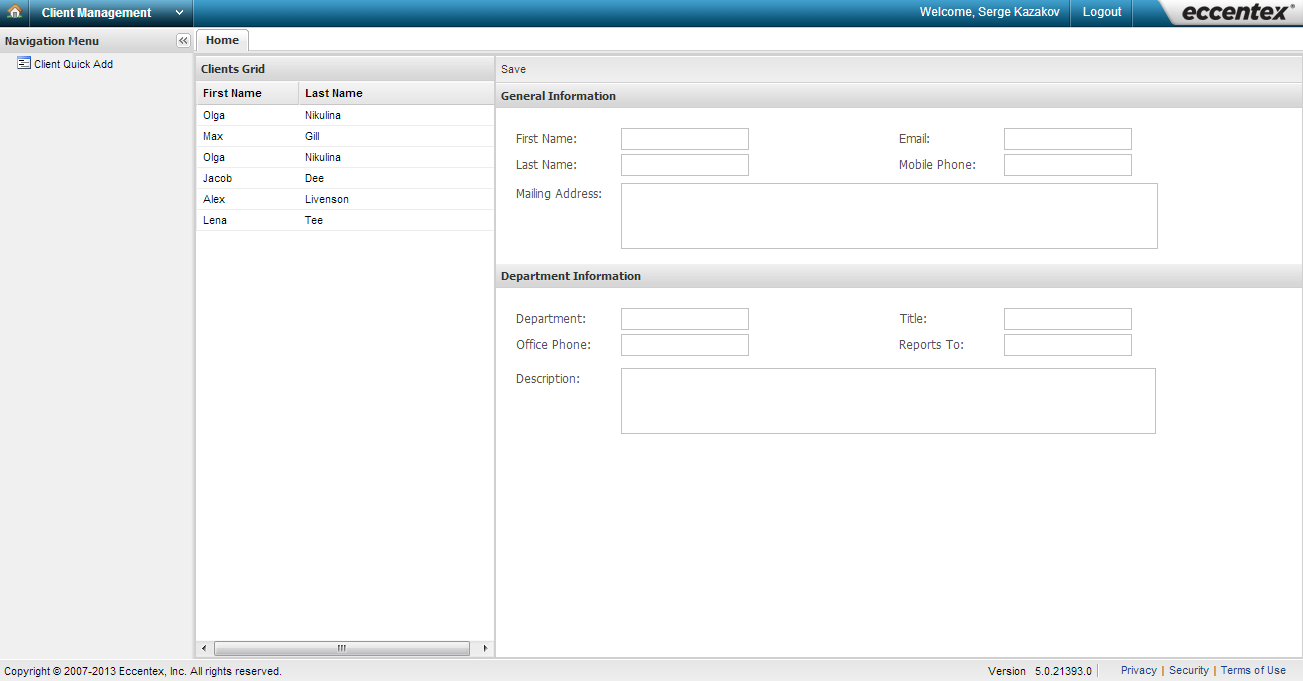
This simple page will create new Customers
Summary
This application will manager a list of clients. It will show the basics of Business Objects, Stores, and Pages. The process of building this app is:
- Create business object
- Deploy
- Create store
- Create page
- Create application
- Deploy
Step 0 - Create A Solution
We’ll start off by creating a Solution.
- On the top left where it says My Workspace, switch to System Setup.
- From the Navigation Menu, click on Solutions.
- Click New Solution with and name is First Solution then your name. For example “First Solution Jane”. And click Save.
- Click on the Manage Versions tab and click on the white icon with a pencil to enter Application Studio.
Step 1 - Create A Client Business Object
We need to create a Business Object for holding a client’s information.
- From the Navigation Menu click on Data Management, and click on Business Objects.
- Click New Business Object.
- Name the Business Object Client.
- Select CRM under Catagories and select Contact under Templates.
- Click Save.
- From the Navigation Menu, click on Deployment Management and underneath it click on Deploy.
- Select the Environment.
- Click Preview
- Click Execute SQL. Wait till you get the green checkbox indicating everything was successful.
- Click Confirm.
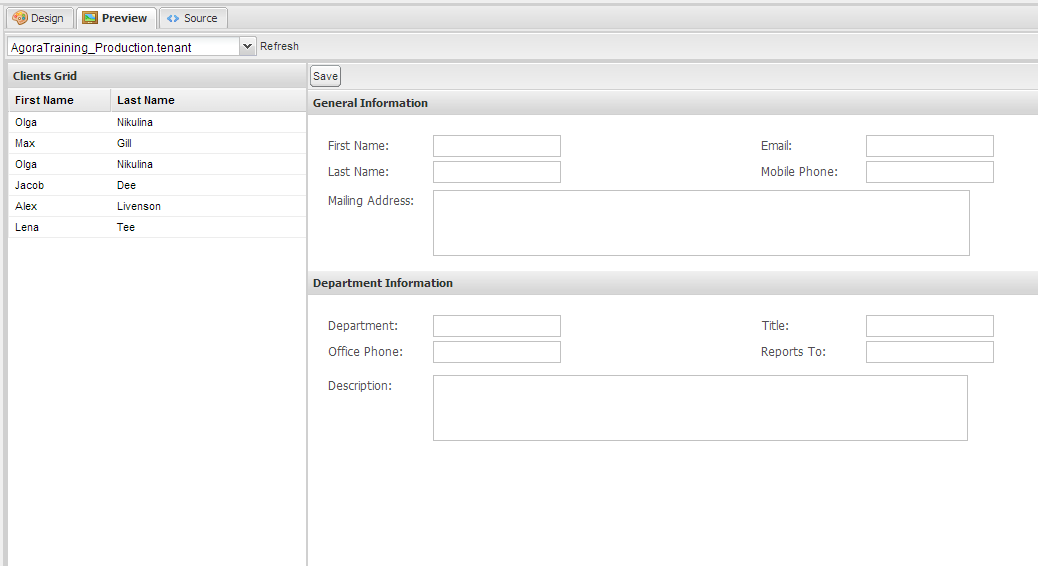
Step 2 - Create A Page
This application will only have one page. On the left will be a list of all clients and the right will be a form for adding new ones.
- From the Navigation Menu, click on Presentations and then on Pages. Click on New Page.
- From Categories select General and from Templates select Blank.
- Name the page Client Quick Add.
- Click Save.
- Click on Page Builder button

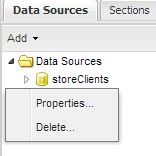
- Find the Data Sources tab
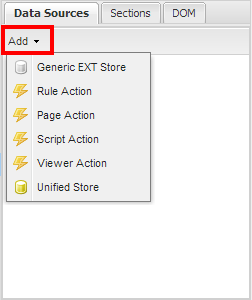
- Click the Add button and Add a Unified Store
- Set its ID to storeClients and click Create
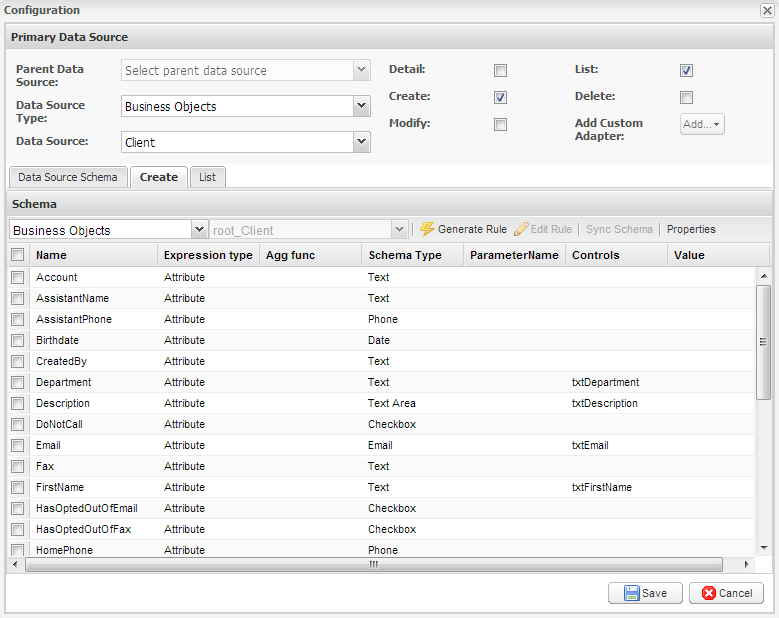
- Make sure storeClients is selected and in the Properties panel at the right of the screen, click on Settings
- Set Data Source Type to Business Objects
- Set Data Source to Client
- Check the Create and List checkboxes
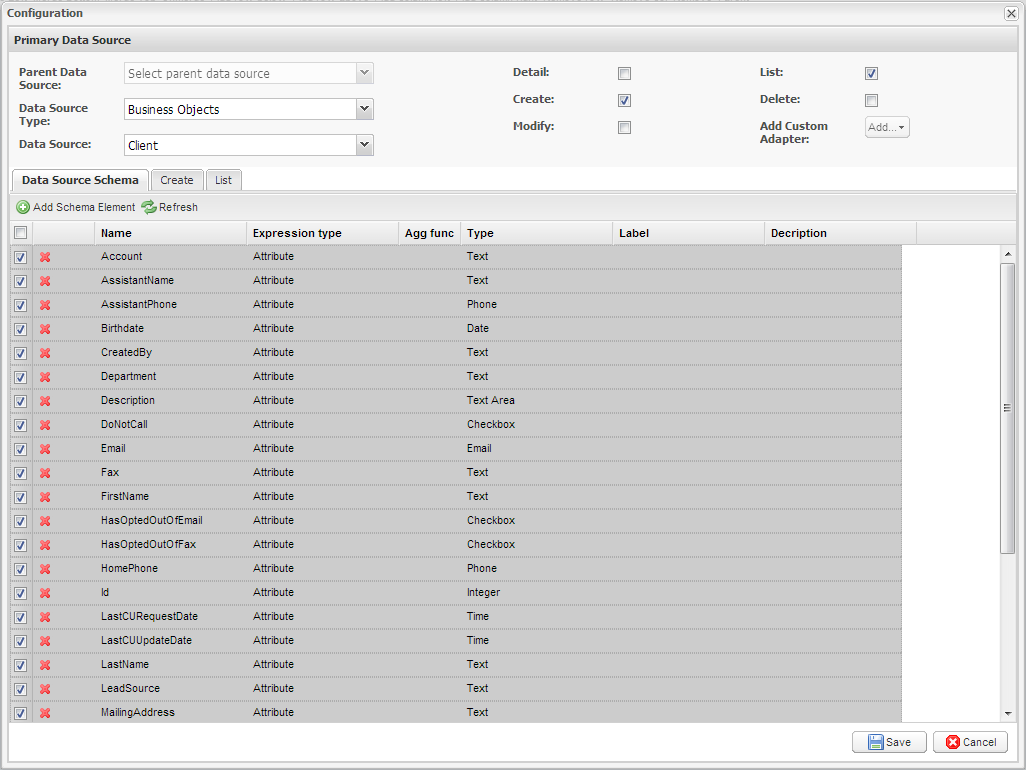
- Click Save
- Click on the Sections tab at the top left of the screen
- Click on pnMain and see pnMain appear in the Design panel

- Find the Properties panel at the right of the screen
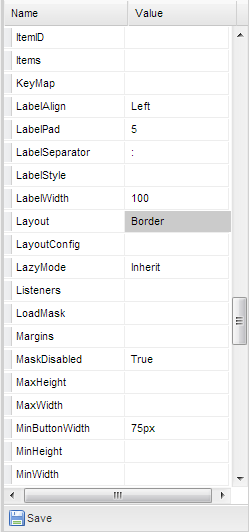
- Set the Layout of pnMain to Border
- Click Save at the bottom of the Properties panel
- From the Toolbox panel at the bottom left of the screen, drag Grid to pnMain
- Assign it ID grdClients
- Assign it title Clients List
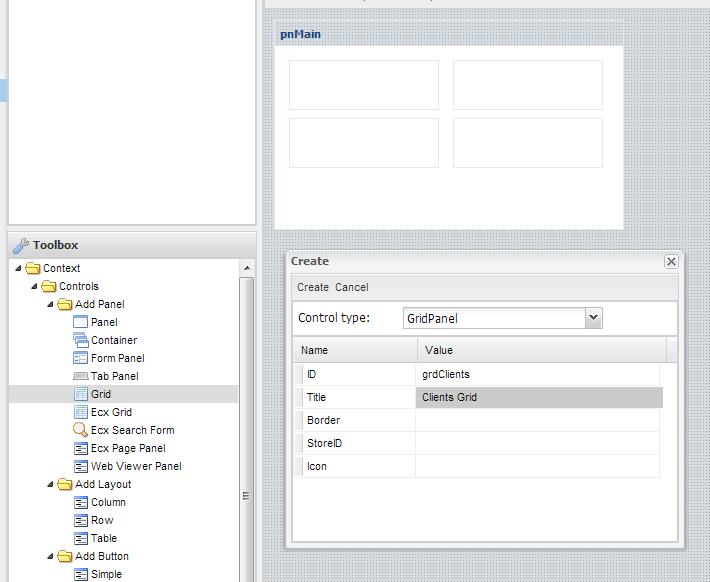
- In Properties, set its Region to West and Width to 200
- Click Save at the bottom of the Properties panel
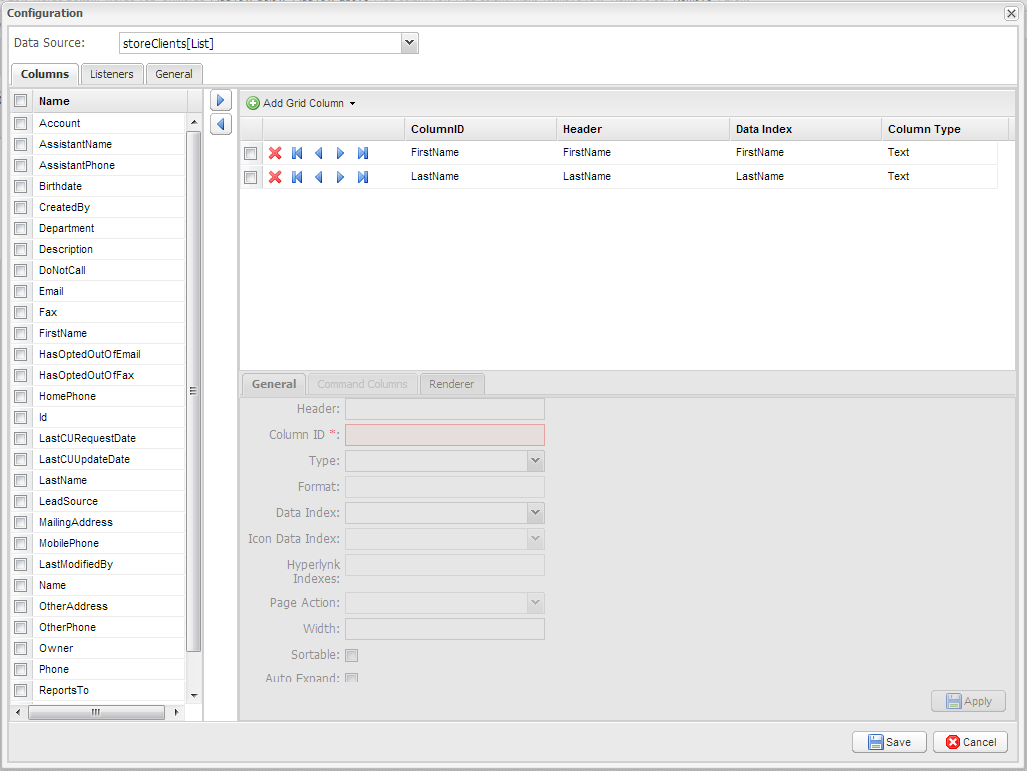
- Make sure grdClients is selected and click on Settings in the Properties panel at the right of the screen
- Set Data Source to storeClients[List]
- Move FirstName and LastName into the columns panel
- Click Save
- Drag another Panel to pnMain
- Assign it ID pnClientDetails
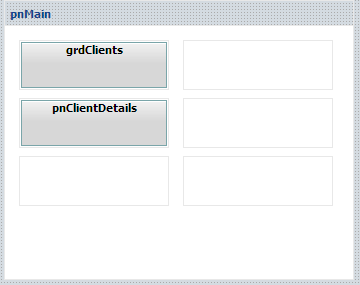
- Make sure pnClientDetails is slected and in Properties set its Region to Center
- Click Save at the bottom of the Properties panel
- Double click on pnClientDetails in the Design tab to see the pnClientDetails design screen
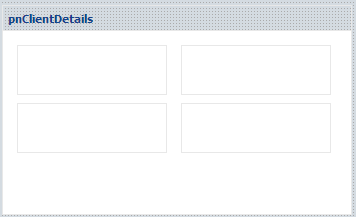
- To pnClientDetails add a panel called pnGeneralInfo, title General Information; set its height to 180, its padding to 20 and its border to false
- To pnGeneralInfo add a panel called pnTopColumns and set its layout to column, its border to false, and its height to 60
- Add two FormPanels to pnTopColumns, one called pnRight1 and one called pnLeft1, and set their ColumnWidths each to .5, and their borders to false
- Distribute 4 TextFields among the 2 column panels: First Name, Last Name, Email, and Mobile Phone
- To the bottom of pnClientDetails also add a TextArea called txtMailingAddress, FieldLabel Mailing Address, width 640
- To pnGeneralInfo add a panel called pnTopColumns and set its layout to column, its border to false, and its height to 60
- Create a similar panel for Department Information (see final screen shot)
- Find the Properties panel at the right of the screen
- Right click on storeClients in the Data Source tab and click on Properties
- In the Create tab, match all the TextFields to attributes of the Client business object in the Controls Column
- Click Save
- In the Sections tab, click on pnClientDetails
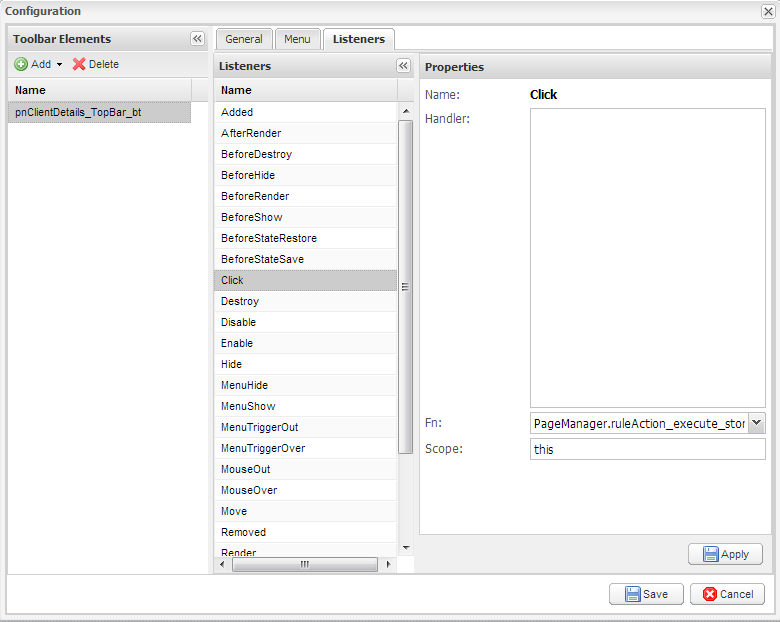
- In the Properties panel, click on TopBar

- Click Add and add a Button, set its text to Save
- Click Apply
- Click on the Listeners tab
- Selected Click from Listeners
- In Fn select PageManager.ruleAction_execute_storeClients_Create
- Click Save
- In the Properties panel, click on TopBar
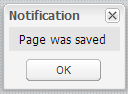
- Click on Save Page at the top left of the screen, and click Ok to the Page Was Saved notification
- Click on the Preview tab
- Type information info the fields and click Save
- Click Refresh and see the first and last name columns in the grid populate
Step 3 - Security Role, Application and Deploy
- From the Navigation Menu, click on Security and underneath it click on Roles.
- Add a Role named ClientWorker. Click Save.
- Go to Applications and make a new User Application called “Client Management”. Upon Save you’ll get redirected to the Application Builder.
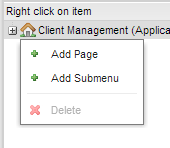
- Right click on the house icon and click Add Page.
- Call it “Client Quick Add”, set it’s icon to User.
- The Target page will be Client Quick Add.
- Check the Start Page checkbox.
- Click Save.
- Right click on the house icon and click Add Page.
- Click on the Application Permissions tab and then the Edit button. Set the ClientWorker to Allow and click Save.
- From the Navigation Menu, click on Deployment Management and underneath it click on Deploy.
- Select the Environment.
- Click Preview
- Click Execute SQL. Wait till you get the green checkbox indicating everything was successful.
- Click Confirm.
- On the top left where it says Application Studio, switch to System Setup.
- From the Navigation Menu, click on User Management and underneath it click on Users.
- Find yourself in that list and click on the blue link.
- Go to the User Roles tab.
- Click Edit and move the ClientWorker for your solution to the right and click Save.
- Logout and Log In.
- Select the Client Management application.
Screenshot